Breakdown 3 of 4
Gameplay systems
I built the event system behind almost every scare in Project UMBRAE, so animators who had never used Unreal could set up their own.
Overview
Project UMBRAE is a Blueprint project with no C++ in the main game, which is why Escape Asset Helper had to be a separate plugin.
Most of my tech art time went on the systems that other people’s work was built on. I prioritised them on purpose, since getting a system in early makes adding content easier for everyone later on. Joel and Kanye covered most of the gameplay programming between them. Several of my systems arrived later than they should have.
Events
The event system is behind almost every scare, audio cue and puzzle trigger in the house. I started it in pre-production by setting up the parent and child categories as blueprints and outlining them to the team.
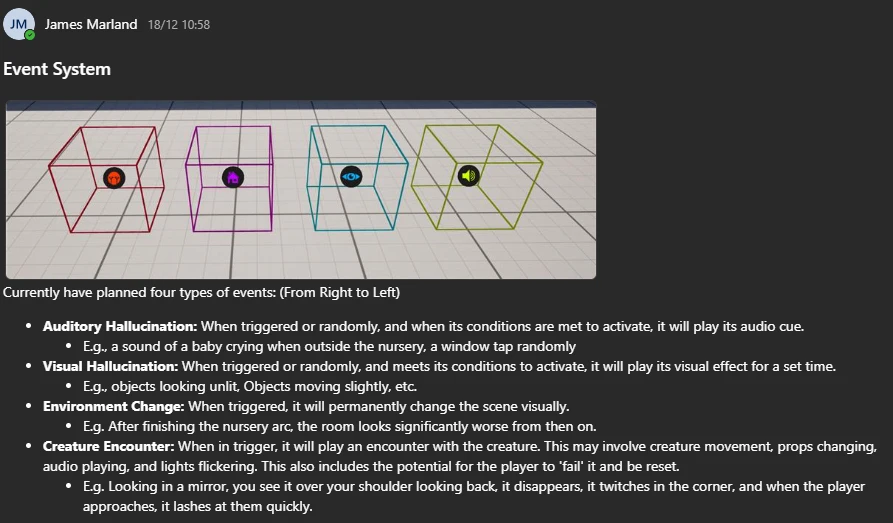
The first real event was a test scare, made once Lauren had given me the creature’s idle animation. The creature flickers in and out of view, and keeps casting a shadow while it’s invisible.
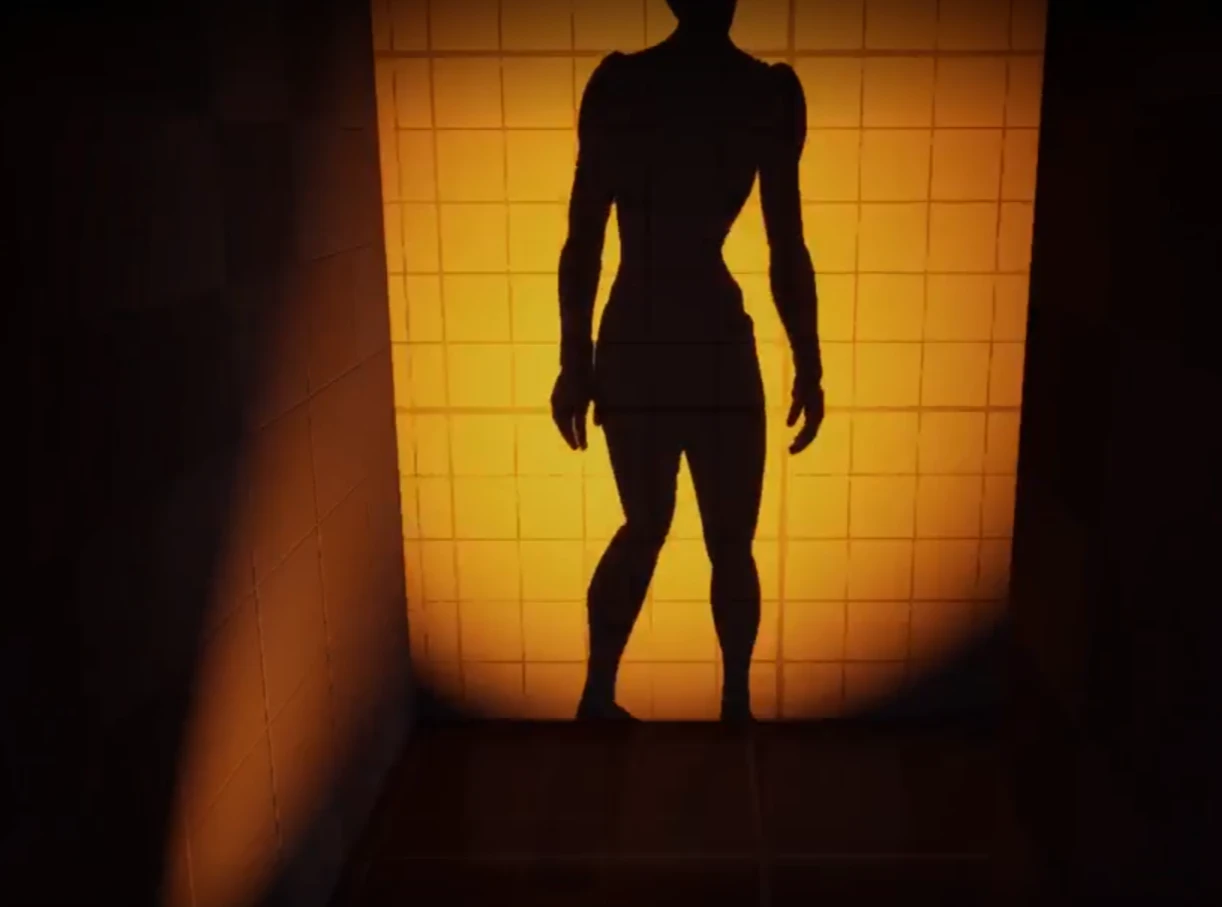
The final game has four event types, all sharing one parent that tracks which state an event is in and whether its conditions let it prime or fire:
- Auditory - plays audio.
- Visual - plays one level sequence all the way through.
- Creature - plays a level sequence in stages, so the creature can react to what the player does.
- Cutscene - plays a cutscene through the cutscene manager.
I walked Lauren through the designer-facing side so she could build her own scares. By the end, our animators, none of whom had used Unreal before, were setting up events themselves.
Look At
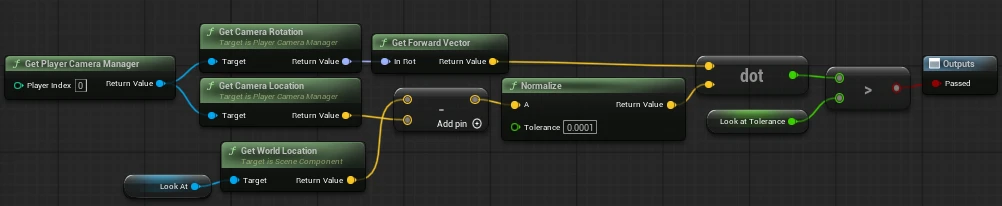
In playtests, players would walk into a scare’s trigger without looking at it and miss the scare completely. To fix that, I added a Look At condition. It takes the dot product of the camera’s forward vector and the direction from the camera to a set point, and compares it against a tolerance that has to hold for a set time before the condition passes (Epic Developer Community, n.d.).
The overhaul
The original event system worked, but it was rigid. Events had no real awareness of the game state, a lot of behaviour was duplicated across the event types, and some of it only worked for creature encounters. Late in production I rebuilt it around a proper conditions system, with all four types on one foundation. Conditions are checked both when an event primes and again just before it fires.
- float
- bool
- enum
State
Active conditions
- Player
- Distance
- Inventory
- World
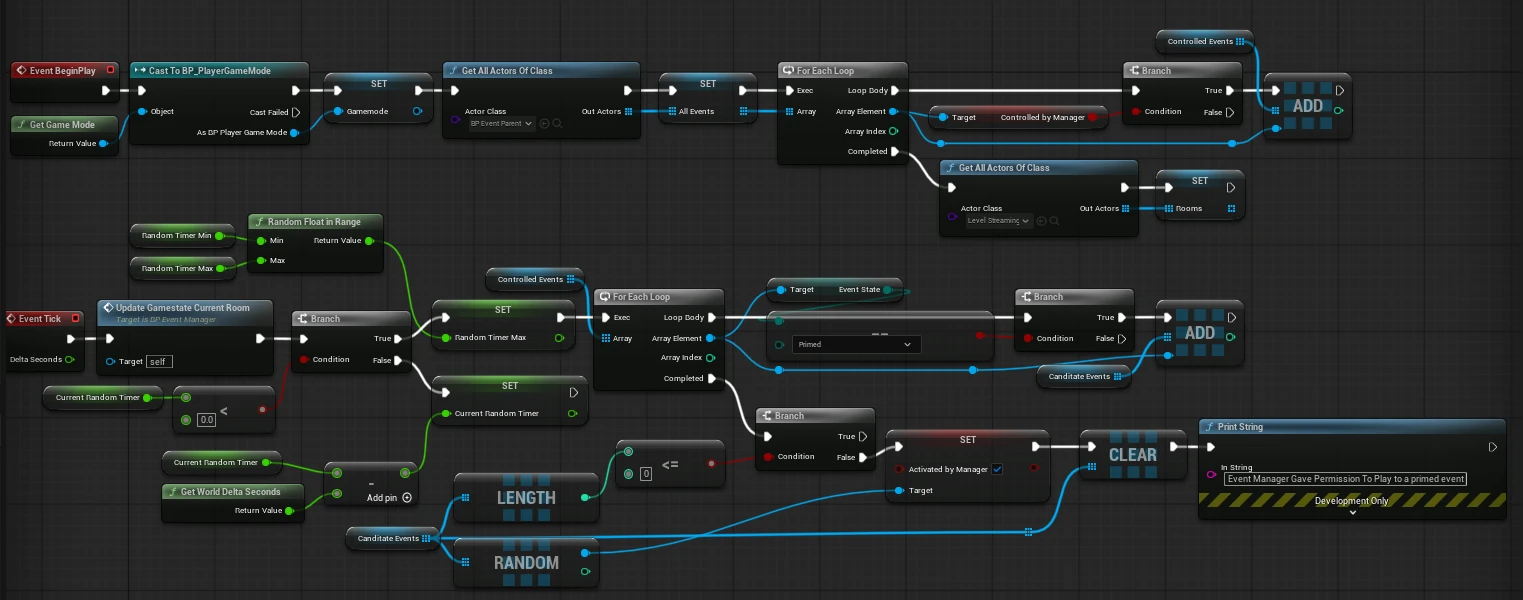
On top of the conditions, the Event Manager decides when events play. It collects every event set to Controlled by Manager, tracks which room the player is in and counts down a random timer. When the timer runs out, it picks one of the primed events at random and gives it permission to play. It can also fire a primed event on demand, which I mostly used for audio.
I also added event system actions to the Level Sequencer, letting a sequence change the player’s speed, close doors, trigger lightning and turn the lights off.
Then every existing event had to be migrated. Old events that were children of a type couldn’t just be reparented, so each one had to be deleted and its conditions set up again by hand. It was tedious work, and easy to get wrong.
Cutscenes
Cutscene logic used to be scattered, with each event handling its own player movement, HUD visibility and whatever should happen afterwards. Now the cutscene manager in the game mode does all of it: playing the level sequence, disabling movement, hiding the HUD, swapping cameras and running whatever comes after.
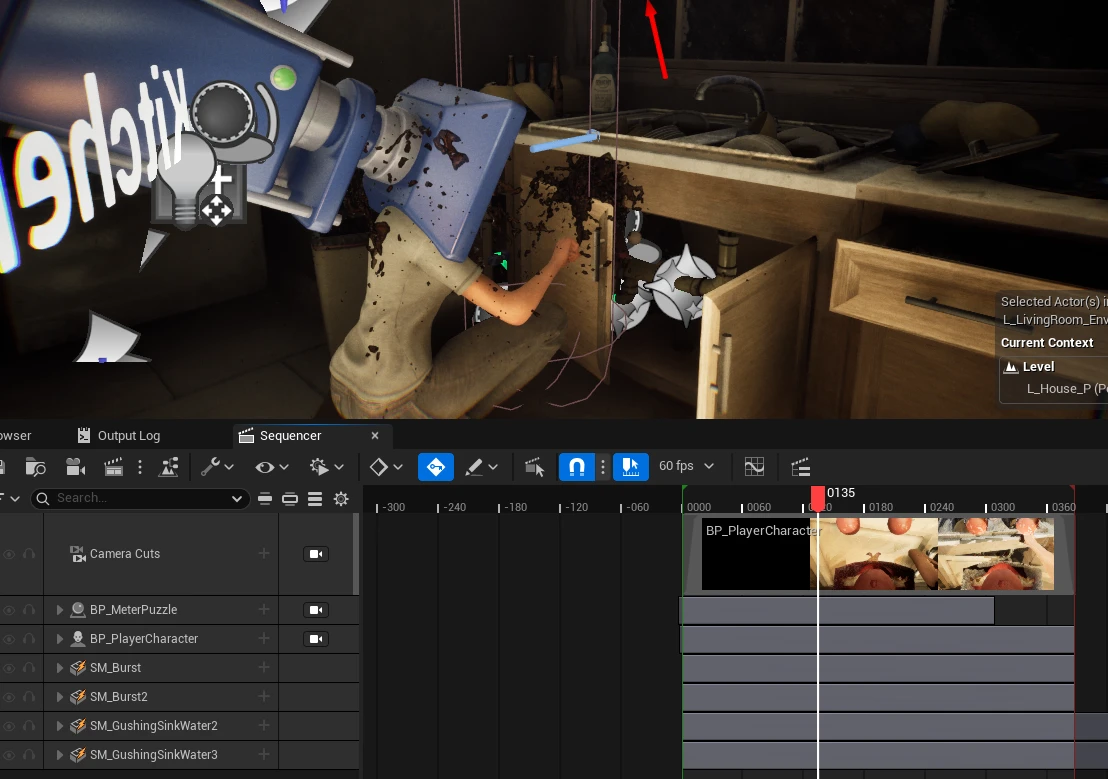
Later I extended it so the player lerps into position before a sequence instead of snapping. Anything they’ve interacted with also keeps its state, meaning doors, lights and items don’t reset after a sequence plays. Getting those states to survive the cutscene was the trickiest part, until I found a save and restore pattern that worked.
I did the technical side of every cutscene, and built a few myself without any of Shanti’s animation, like the breaker switch and the sink.
Lights, doors and openables
The light system puts every rect, spot and point light under one parent blueprint. A light can be turned on from a switch or by clicking the light itself, and its light health sets how often and how hard it flickers, throwing sparks as it does. The light’s type sets its audio, so a fluorescent tube hums differently to a bulb. It replaced a lot of per-light setup scattered across the project, and meant Matty could adjust every interactable light in the same way.
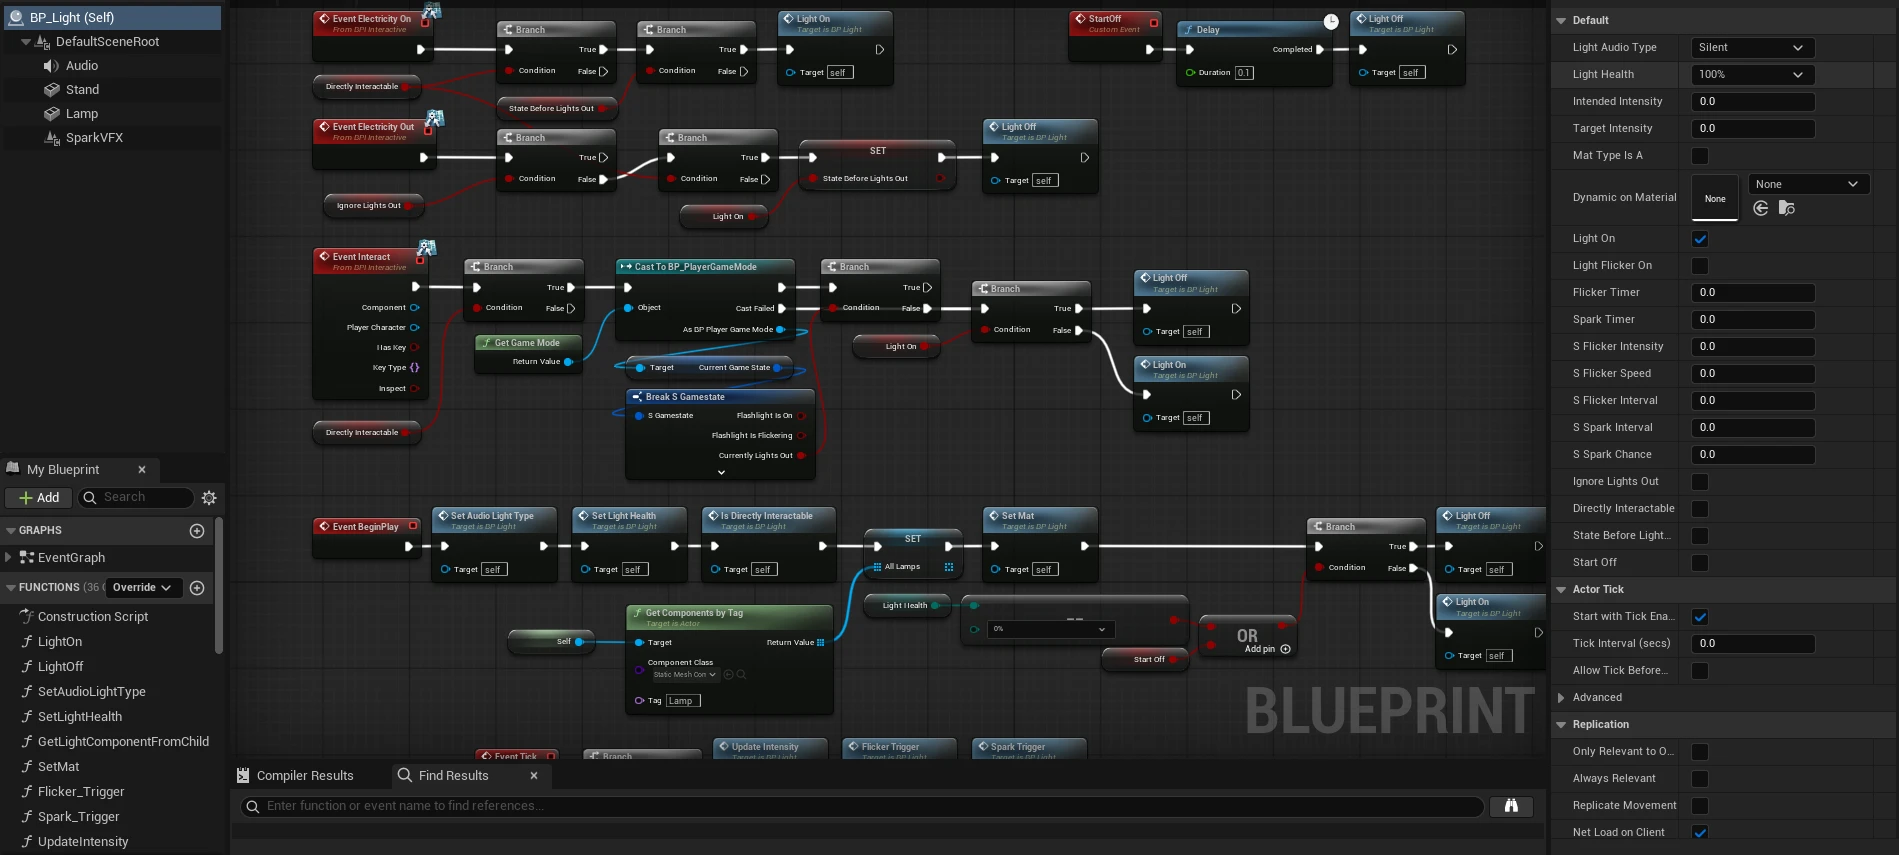
Doors open and close on curves, and send a callback when they finish opening, for any blueprint that needs to know. The basement door slams harder than the rest, to make it clear something supernatural did it.
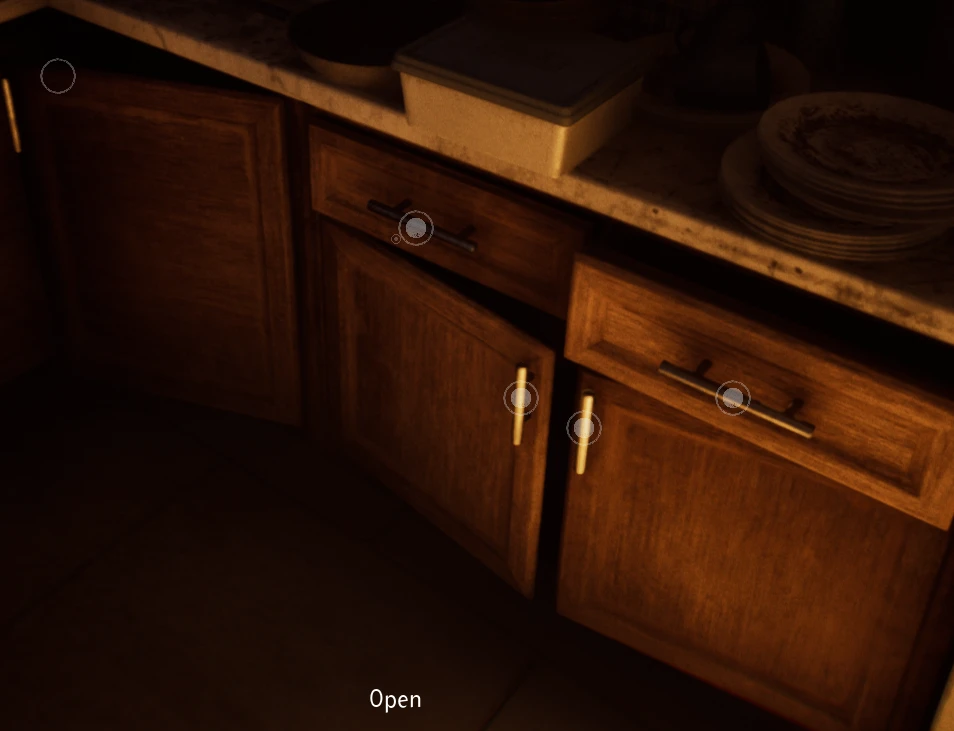
The generic openable is a custom static mesh component with an open and a closed transform, and it lerps between the two when clicked. Drawers, cupboards, the fridge and the oven all use it without needing their own blueprints, and one piece of furniture can have any number of doors and drawers.
Footsteps, icons and the TV
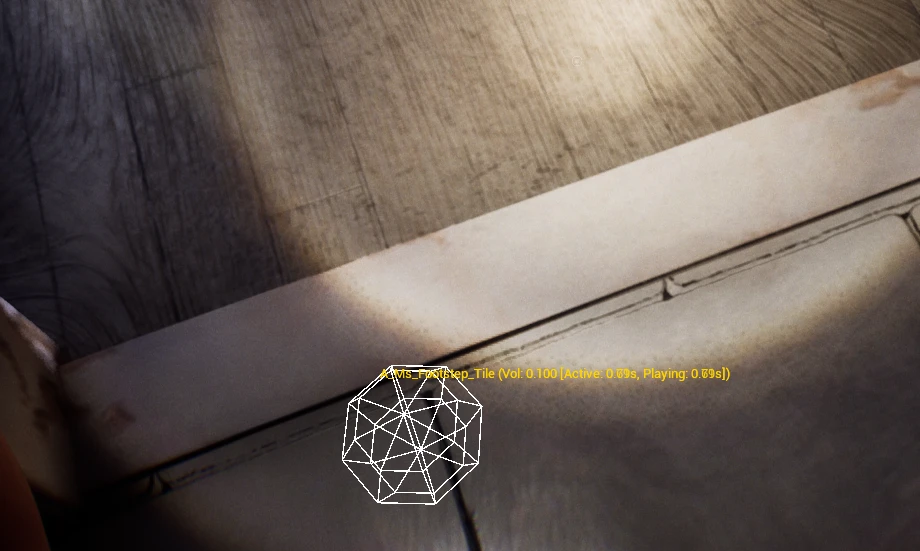
The footsteps started out as one generic 2D sound, which felt wrong for a horror game. I made them quieter and spatialised at the player’s feet, built MetaSounds with random variations for each surface, and did a pass of physical materials so every floor returns the right surface type.
Near the end I added interaction icons, because players were mostly finding out what was interactable by trial and error. The icon is a world-space widget on a custom component, so any interactable gets one with almost no setup. It fades in when the player is nearby and looking at the object, and fades out again when they look away.
The interactive TV on the cover is mine too. It has dynamic lighting, audio and a shader on the screen, and picks its video from the game state. While it’s off, it keeps track of where the live feed would be, and turning it back on picks up at the right point. The main menu uses the same shader, and the TV handles the transition from the menu into the start of the game.
The flashlight is the main light source for most of the game. I gave it a light function using one of David Gruwier’s flashlight textures (Gruwier, 2026), which I picked because it has real colour detail, where most are greyscale.
The player and the MetaHuman pivot
When the team switched to MetaHumans (Epic Games, n.d.) in Week 9, moving the player onto the MetaHuman skeleton was my job. The producer side of that decision is on the producing page.
A lot of the underlying systems had to be ported, and the switch broke them in subtle ways. Retargeting animations, migrating bones and fixing mesh detail settings took a lot of debugging, with Shanti’s help spotting issues. I set the player up to take its meshes straight from Amy’s export location, saving anyone from swapping them by hand after every change, and turned the foot placement IK back on after it had been disabled early on.
This was my first real technical animation work. I’m more confident with it now, but it isn’t an area I want to focus on. Animation is a fragile system, and it needed some of the most dedicated bug fixing of the whole project.
The portal
Early on, the team wanted non-Euclidean spaces, so in Week 2 I built a proof of concept portal to show everyone how it would look and work. Dev Squared’s videos (Dev Squared, 2023) (Dev Squared, 2024) showed me how a walk-through portal is set up in UE5. Performance wasn’t the focus yet.
Each portal shows a render target filled by a scene capture at the linked portal. When the player is nearby, the capture copies the player camera’s position and rotation relative to the other portal, so the view moves the way it would through a hole in the wall. Most of it is done with inverse transforms and Mirror Vector by Normal: the camera is taken into the portal’s local space, mirrored, and transformed back out through the linked portal.
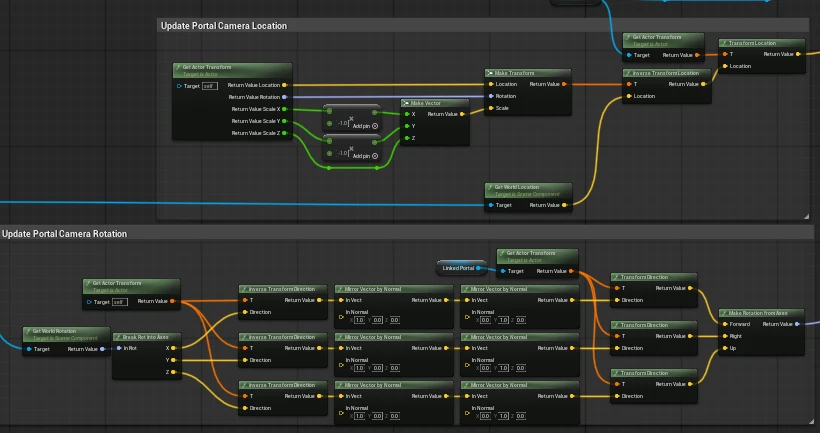
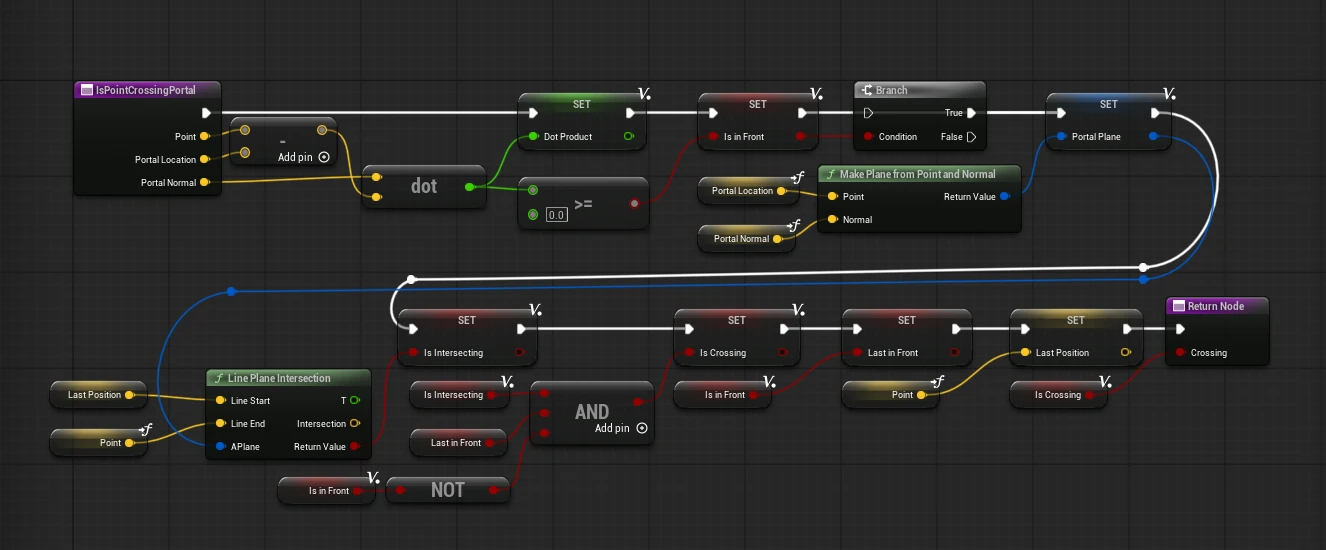
Teleporting works in a similar way. It mirrors the player’s location and the camera’s location and rotation relative to the portal, and carries the player’s velocity through to the other side. To stop the player being teleported back and forth, the teleport waits for the exact moment they cross the plane. That check kept failing at first, because I’d set up the line plane intersection in the wrong direction.
Why it was cut
We wanted high-fidelity mirrors as well as portals that showed the scene accurately. I compared screen space reflections, the Lumen cache, planar reflections and cubemaps, and every option was either expensive or low quality.
I took the options to the team and we settled on a mix. Mirrors use planar reflections plus screen space reflections, which is reasonably cheap and still looks good. Portals became duplicate rooms, with doors as the teleport points.
The portal prototype worked, but its cost made it clear it wouldn’t work the way we wanted in the full game, and the non-Euclidean spaces were cut along with it.
Problems and fixes
- The IK feedback loop - In the last few weeks I set the player up for EnviroSense, a plugin that uses procedural animation to attach the hand to whatever it’s touching. I scaled it back to fit the time left and tried to get it working for just the flashlight, which was probably the hardest case. The torch was attached to the player through a socket, and the IK then tried to move the hand to the torch, so each one drove the other in a loop and the arm spasmed out of control. In the end I dropped it.
- Editor and packaged builds disagreeing - The stone door and the clock worked in the editor but broke in builds, because cast timing is slightly different in a packaged build. They now retry their casts if the first attempt fails.
- Controller support - Adding it broke the sliding and sink puzzles, in ways that took some time to trace back to input handling.
- The cutscene manager arriving late - It works, but it didn’t exist early enough for the animators to iterate against, which left less time to polish the cinematics.
- Perforce filling up - Twice in the last week before the showcase, the server ran out of space and we had to wait until it was sorted.
Reflections
The biggest thing I’d change is building these systems in Week 5 instead of Week 15. The event system overhaul got rid of a lot of duplicated logic, but every event built before it still had to be migrated. The light system, the cutscene manager and the openables all came late as well, and each would have been cheaper to build first and use everywhere than to retrofit.
Sources
Dev Squared (2023). Seamless Portals made in Unreal Engine 5. YouTube.
How a walk-through portal works in UE5, through camera reprojection and render targets.
Dev Squared (2024). How to Create Third Person Portals | Unreal Engine 5. YouTube.
The second half of the portal research.
Epic Developer Community (n.d.). Checking if player is looking in a specific direction?. [online] Unreal Engine Forums. Available at: https://forums.unrealengine.com/t/checking-if-player-is-looking-in-a-specific-direction/423325.
Research for the Look At condition.
Epic Games (n.d.). Getting Started with MetaHuman Creator. [online] Epic Developer Community. Available at: https://dev.epicgames.com/documentation/en-us/metahuman/getting-started-with-metahuman-creator [Accessed 20 May 2026].
The switch to MetaHumans and the player rebuild that followed.
Gruwier, D. (2026). DGruwier Flashlight Textures. [online] Gumroad. Available at: https://dgruwier.gumroad.com/l/dgruwier-flashlights [Accessed 22 May 2026].
The flashlight's light function texture, bought on an educational licence.